Showing posts with label tutorial. Show all posts

Mar 24, 2021

Sewing Tutorial for Harvest Poncho


Photo by I Like Knitting

Sometimes I receive emails with questions about my knitting patterns and request for further explanation on how to make certain aspect of different knitting patterns. I try to response within a reasonable amount of time and provide the information to help those who ask better understand how things were done and created. 
Recently I received a question about the Harvest Poncho how the two rectangles are sewn together. The pattern itself provides schematic with drawing. However the schematic is a two dimensional and as another visual help I have decided to create this photo tutorial to make it more clear.


I have knitted two mini rectangles of what the two actual rectangles will look like when finished. For a better  understanding I made the two rectangles in two different colors.


Position the two rectangles as in this picture, making sure that the right sides are facing the same direction.


Sew the two rectangles together. along the edge using a mattress stitch. After this you have a "L" shape. In the picture bellow you can see the first seam in the left corner where the red arrows points.


The second seam will take place between the points A and B along the edge. In the picture above you can see the orange rectangle with WS facing up and the grey rectangle RS facing up. The orange rectangle RS is on the bottom at the moment. In the picture bellow you can see that the edge is sewn and the right sides are on the outside and the wrong sides are inside of the poncho.


After this seam you are almost finished.  

One side will look like this :


The other side will look like this:


Weave in  the ends and enjoy your Harvest  Poncho. 

Bellow is the link to the pattern itself:


Thank you for visiting.

Sep 22, 2019

Tutorial for Bind Off

The tutorial for the Bind off  I used to join the cast on edge to the bind off edge.
1. Position the cast on edge behind the work, making sure that all the knots are hidden inside, between the two layers of your work.
Step 1
Step 1. The yarn is held behind both layers of your work. With right hand needle pull through the cast on edge.

Step 2
Step 2. Pull the yarn through the cast on edge.


Step 3
Step 3. Pull the yarn through the first stitch on left hand needle.

Step 4
Step 4. Remove the stitch from the left needle.
After the first stitch is on your right hand needle, continue step 1-4 for the second stitch. then continue with step 5.

Step 5
Step 5.  Lift the second stitch over the stitch next to it on your right hand needle.

Step 6
Step 6.  Bind off.

Bind off joining both sides of your work.
Continue with steps 1 - 6 until your reach the end of your work. Cut the yarn, pull through the last stitch and weave in ends.

Scraptastic Cowl

The pattern for the Scraptastic Cowl is here:
Scraptastic Cowl
Thank you for visiting.

Dec 4, 2017

Attaching zippers - tutorial

Some of my knitting patterns have an option of adding a zipper. Pictured bellow as a sample is my  minion pencil box
minion pencil box

Here is a simple tutorial to make it easier for my blog readers, or visitors.

Step 1. Pin the zipper to the knitted piece, using a sewing pins.
If using a layer of fabric, pin the zipper between the two layers of fabric and knitted fabric.


Step 1 - pin together zipper and knitted fabric

Step 1 - pin together zipper and fabric and knitted fabric
Step 2. Using a needle and a tread sew together the layers with easily removable thread. The stitches can be long and slightly loose as they will be later removed. Remove the pins.

Step 2 - loosely sew together the zipper and fabric layers. 
Step 3. Using a sewing machine, or by hand,  sew the zipper firmly to the knitted fabric, and (if using) to the fabric.
Step 3 - zipper sewn by hand
Step 3 - zipper sewn on a sewing machine
Step 4. The zipper should be securely attached. Remove the loosely sewn thread from Step 2.


Finished project
Thank you for visiting.

Jun 23, 2017

Watermelon Coasters - attaching the fabric tutorial

Step 1
Step 1. Lay the knitted piece on top of fabric with wrong side facing each other, and right side being opposite.
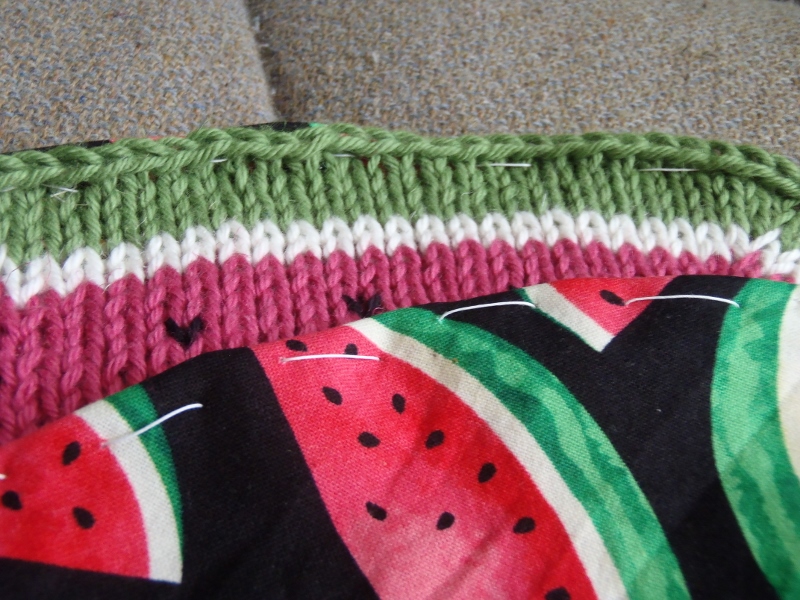
Step 2
Step 2. Pin together the two layers with pins or safety pins.

Step 3
Step 3. Cut out the fabric approximately 1.5" (4 cm) larger than the knitted piece.
Step 3 - detail
Step 4
Step 4. Using a thread, sew the two layers together along the edge, folding the extra fabric inside.
Step 4 - detail

Step 4 - both sides view

Step 5. Sew the two layers together using sewing machine or by hand.

Step 5 - finished coaster.