Oct 27, 2020

Witch's Hat

 "Some day you will be old enough to start reading fairytales again."

                                                                    C. S. Lewis


Every witch needs a good hat. The knitting pattern for this witch's hat is available to purchase on Lovecraft and Ravelry, and on Payhip. Links to all are on the side of my blog home page.


You can also purchase the pattern by clicking on this button, it will direct you to Ravelry.


This is a third pattern in the series of whimsical patterns inspired by fairytales.  


A whole e-book will be available by the end of this year. Here you can see a sneak preview from the photoshoot for the e-book. 


Thank you for visiting.

Oct 17, 2020

Cat Pin Cushion

  "You are never too old to set another goal, or to dream a new dream."

                                                                              C. S. Lewis 


Cat Pin Cushion is second pattern in this collection of knitting patterns and more on this journey into the fairy tales that started with the beginning introduction. Broomstick was the first knitting pattern published this month. In the picture above you can see the third knitted item along with the broomstick and cat pin cushion. 

At the end of this journey a whole collection of whimsical knitting patterns and more will be available as an e-book, or each individual knitting pattern will be available separately. 
If you would like to purchase the pattern for this Cat Pin Cushion, you can buy it in my Ravelry store, on Lovecraft, Payhip, or by clicking on this button (which will take you to the Ravelry purchase download):


Thank you for visiting, don't forget to stop by to see the next pattern and more.

Oct 11, 2020

Knitting Pattern for Scraptastic Pillow

 Do you remember my previous Scraptastic Projects?


Pictured are Scraptastic Cowl and Scraptastic Scarf.

 I have been collecting all those tiny scraps of yarn from other projects and tight them together and create a ball of yarn. This ball of scrap yarn is so colorful and random. I have to admit the Scraptastic Scarf is my favorite scarf to wear through the winter months. 

After creating the Scraptastic Scarf and Scraptastic Cowl I was thinking about my next Scraptastic Project while I was collecting the tiny scraps of yarn. In the end I decided to make a pillow case. As always with the scrap yarn projects it takes time to get enough scrap yarn for the whole project. With this pillow case I decided to use up even small remnants of yarn skeins that has been collecting for some time. Sometimes I would find these remnants useful in knitting toys, but mostly these small remnants were too small to use for the toys. This is the beginning of Scraptastic Pillow Case. 


As time went on I would add few rounds here and there whenever I had some yarn leftover from another knitting project. As you can see from the picture bellow, the dog approved it as a pillow for one of his naps. 


Today I finished the Pillow case, added zipper to the CO edge and here you can see the wrong side of the pillow with all those knotted yarns.


Scraptastic Pillow
written by Stana D. S.


Finished Measurements: 18" (46 cm) [20" (51 cm), 22'(56 cm), 24" (61 cm), 26" (66 cm), 28" (72 cm)] Square. Pictured pillow sample is 28" (72 cm) Square.

Material: Scrap Yarn from other knitting projects, preferably in similar weight. If using thinner yarn such as fingering weight, double the yarn. This is a fantastic project for all those tiny leftovers and small pieces of yarn that otherwise might be thrown out.

Gauge: 16 sts & 26 rows = 4" (10 cm) in double moss stitch.

Recommended Needle Size: Circular Needles US 7/4.5 mm.

Notions: Yarn needle, scissors, zipper 18" (46 cm) [20" (51 cm), 22" (56 cm), 24" (61 cm), 26" (66 cm), 28" (72 cm)] long. Pillow case insert 18" (46 cm) [20" (51 cm), 22" (56 cm), 24" (61 cm), 26" (66 cm), 28" (72 cm)] large.

Abbreviations:
K = Knit
P = Purl
CO = Cast on
BO = Bind Off
St, sts = stitch, stitches

Pattern Notes:
This Scraptastic Pillow is knit in the rounds in double moss stitch pattern, using whatever scraps of yarn you have from other knitting projects. All the ends are conveniently hidden inside this pillow case. The zipper is sewn to the CO edge. The top of the pillow is BO with 3 Needle Bind Off.

Double Moss Stitch Pattern (worked in the round, over multiple of 4 sts):
Rnds 1 - 2: K2, P2.
Rnds 3 - 4: P2, K2.
Repeat Rnds 1 - 4 for the pattern.

Directions:
CO 144 (160, 176, 192, 208, 224) sts. Place the stitch marker, and begin working in the round, being careful not to twist the sts.
Work in the Double Moss Stitch Pattern using the various scraps of yarn in similar weight, connecting the scraps with a knot, and making sure the knots are all on one side.
Work in the pattern until you reach the desired length of the square pillow. 
Make sure that all of the knots are on one side of your work. 
Turn the work inside out and BO using the 3 Needle BO technique.

Finishing:
Pin the zipper to the CO edge and sew the zipper to the CO edge.
Insert the pillow.
Here is a link to my picture tutorial for attaching zippers.


Thank you for visiting. 

Oct 4, 2020

Broomstick

 "Life itself is a most wonderful Fairy tale" H. Ch. Andersen 


Finished Measurements:  6.5” (17 cm) long. 

Suggested Yarn: Worsted Weight Yarn. 
Cascade 220 Superwash (100% Superwash Wool; 220 yards / 200 meters per 100g / 3.5oz) 1 skein each: color options: 211 Cocoa (MC), 870 Straw (C1), 1926 Doeskin Heather (C2).

Yardage: 10 yards / 9 meters (MC), 4.5 yards / 4 meters (C1 and C2).

Recommended Needle Size: Double Pointed Needles (DPN) US #5/3.75mm (set of 5) or your preferred needles for knitting in the round.

Notions: Yarn needle, scissors, pipe cleaners.

Gauge: 20 sts & 26 rows = 4” (10 cm) in stockinette stitch.

Abbreviations: 
C1, C2 = Contrast Color
CO = Cast On
DPN = Double Pointed Needles
MC = Main color
St, Sts = Stitch, Stitches

Techniques:
I-cord:
The set amount of sts are knitted from one needle to a second needle, do not turn the needle with sts around, just push the sts to the beginning of the needle and knit again. This technique makes a tube.

Note:
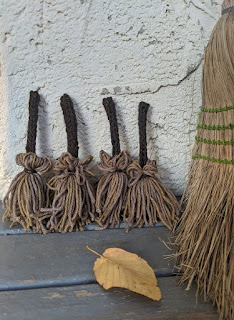
The broomstick is created by making an I-cord with inserted folded pipe cleaner. The bottom part of the broomstick is created by cutting 40 pieces of yarn for the tassel, the yarn is folded in half and secured to the I-cord by a knot. 

INSTRUCTIONS:
Handle:
With MC and DPN CO 4 sts.  
Work I-cord for 8 rows.
Bend the pipe cleaner in half and insert the pipe cleaner with the ends pointing away or toward the CO edge. 
Continue to work the I-cord around the pipe cleaner, until the I-cord is as long as the bended pipe cleaner. Cut the yarn, leaving a long enough tail, and thread the end on a yarn needle. Pull the end through the remaining stitches on the needle, gather up and close the hole, stitch to secure. 


Finishing: 
Tassel:
Cut 20 pieces each of C1 and C2 approximately 8” (20 cm) long. Fold in half. Arrange the folded yarn around the I-cord handle, and secure with a knot. 
Weave in the ends. 


Thank you for reading.
Follow the journey from the beginning... and don't forget to come back for more....

If you prefer to own this pattern as PDF file, you can purchase it on Lovecraft website  or on Ravelry by clicking on this button


Oct 2, 2020

The beginning.....

 "Everything you look at can become a fairytale and you can get a story from everything you touch"

                                                                                                              Hans Christian Andersen


Every story has a beginning....

Once upon a time....a girl went for a walk into a forest. She came upon a crossroads.  For a moment she stood there and then...


She choose the path which led her on a journey into the world of fairytales, a world filled with imaginations and fantastic creatures. A world where nothing is ordinary and everything can turns into extraordinary. 


Open the door and enter the world of fairytales with me. 


Look at the picture bellow. Do you see the beautiful light? Look closely and let your imagination run free. 


When I look at this picture I see the beginning of a journey into the fairytale.......

Follow my adventure. I will post over the next three months pictures, knitting patterns and more, like a little bread crumbs along the path. 


Thank you for visiting and reading. Don't forget to come back for more....