Oct 25, 2012

Knitting Pattern for Maillie, the Travelling Monster

Maillie, the Travelling Monster combines two of my favorite things. Knitting toys and fair isle/stranded colorwork technique.

Maillie, has a pocket where a smaller toy or a surprise can be hidden.
She or He is about 8" (20 cm tall).
You will need approximately two balls of yarn in contrasting colors.
The pattern is written, with photographs and chart for the fair isle/stranded colorwork.

The pattern can be purchased on Ravelry or by clicking on this button.


Thank you for visiting.

Oct 17, 2012

Knitting Pattern for Blobb


Blobb
by Stana D.S.

Finished Toy size: approximately 4 - 4.5” (10 - 12 cm) tall

Yarn: You will need less than a ball of yarn in sport to medium worsted weight. Also you will need small amount of black embroidery yarn for embroidering the face.

Recommended Needles size: Double pointed needles US #3/3.25mm (set of 4)

Notions:
Yarn needle, crochet hook, scissors, stitch marker, polyester fiberfill (1 small bag).
Abbreviations: KFB = Knit in front and back of the same st, this creates 2sts from 1st.
SSK= slip st, slip st and knit the 2sts together, this decrease 2sts to 1st.
I-cord = the sts are knitted from one needle to second needle, do not turn the needle with sts around, just push the sts to the beginning of the needle and knit again. This technique makes tube.

Gauge: will vary with the yarn used.


INSTRUCTIONS:
Body: With the yarn and three pointed needles cast on 60sts. (20sts. per needle)
Place a stitch marker on the first st, and begin working in the round.
Row 1 - 10: Knit around (60sts. total)
Row 11: *SSK, Knit 18; repeat from * around, 19sts per needle (57sts total)
Row 12: * Knit 9, SSK, Knit 8; repeat from * around, 18sts per needle (54sts total)
Row 13: *SSK, Knit 16; repeat from * around, 17sts per needle (51sts total)
Row 14: * Knit 8, SSK, Knit 7; repeat from * around, 16sts per needle (48sts total)
Row 15: *SSK, Knit 14; repeat from * around, 15sts per needle (45sts total)
Row 16: * Knit 7, SSK, Knit 6; repeat from * around, 14sts per needle (42sts total)
Row 17: *SSK, Knit 12; repeat from * around, 13sts per needle (39sts total)
Row 18: * Knit 6, SSK, Knit 5; repeat from * around, 12sts per needle (36sts total)
Row 19: *SSK, Knit 10; repeat from * around, 11sts per needle (33sts total)
Row 20: * Knit 5, SSK, Knit 4; repeat from * around, 10sts per needle (30sts total)
Row 21: *SSK, Knit 8; repeat from * around, 9sts per needle (27sts total)
Row 22: * Knit 4, SSK, Knit 3; repeat from * around, 8sts per needle (24sts total)
Row 23: *SSK, Knit 6; repeat from * around, 7sts per needle (21sts total)
Row 24: * Knit 3, SSK, Knit 2; repeat from * around, 6sts per needle (18sts total)
Row 25: SSK all around, 3sts per needle (9sts total)
Row 26: Knit around (9sts total)
Row 27: *SSK, Knit 1; repeat from * around, 2sts per needle (6sts total)
Row 28: SSK all around (3sts total). Continue in I-cord till the length of I-cord is approximately 4” long. Cut the yarn, leaving long enough tail, and thread the end on a yarn needle. Pull the end through the remaining stitches on needle, gather up and close the hole, stitch to secure.

Bottom: Attach the yarn to the rim with cast on sts. With a crochet hook, or DPN pick up 60sts on the inside part of the bottom edge. Divide the sts evenly onto 3DPN (20sts per needle) and begin working in the round. Begin to stuff the body with fiberfill.
Row 1: *SSK, Knit 8; repeat from * around, 18sts per needle (54sts total)
Row 2: *SSK, Knit 7; repeat from * around, 16sts per needle (48sts total)
Row 3: *SSK, Knit 6; repeat from * around, 14sts per needle (42sts total)
Row 4: *SSK, Knit 5; repeat from * around, 12sts per needle (36sts total)
Row 5: *SSK, Knit 4; repeat from * around, 10sts per needle (30sts total)
Row 6: *SSK, Knit 3; repeat from * around, 8sts per needle (24sts total)
Row 7: *SSK, Knit 2; repeat from * around, 6sts per needle (18sts total)
Row 8: *SSK, Knit 1; repeat from * around, 4sts per needle (12sts total)
Row 9: SSK all around (6sts total). Finish stuffing the body with fiberfill. Cut the yarn, leaving long enough tail, and thread the end on a yarn needle. Pull the end through the remaining stitches on needles, gather up and close the hole, stitch to secure.

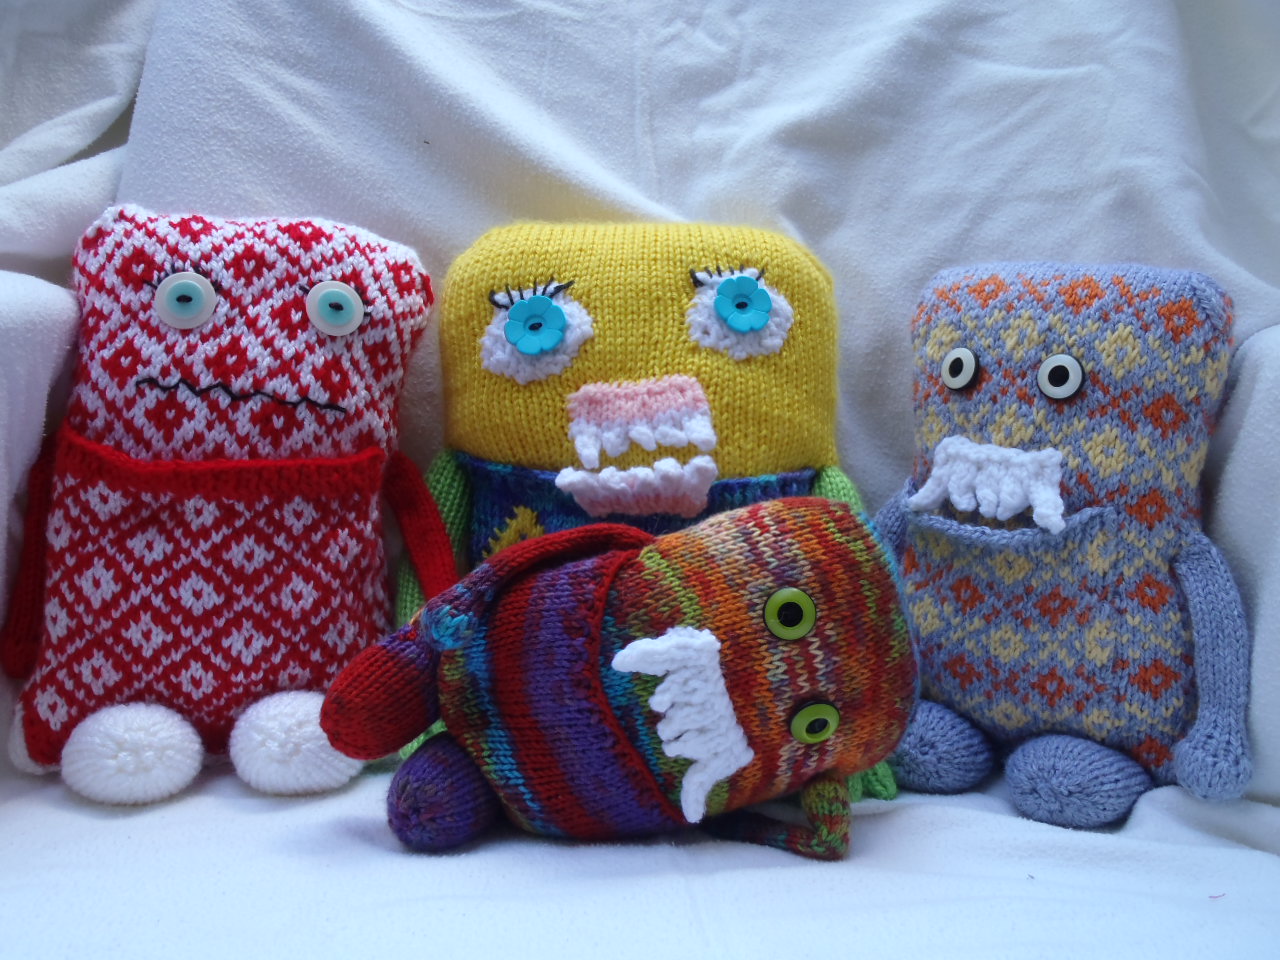
Finishing: With the black embroidery yarn embroider the eyes and mouth on Blobb's face, using the picture as a guide, or make your own face. 

Note: It is possible to make Blobb in one piece. You would start with the I-cord at the top. After making the I-cord, the decrease rows  would be increase rows instead, and you would make KFB instead of SSK  (You would start at the row 28 and work your way in opposite direction towards the row 1).  Purl row 1 and than continue with the bottom decrease. I prefer the other direction simply because my decrease stitches look neater than my increase stitches.

Copyright: This pattern was design and written by Stana D.S. The pattern is for personal use only. The finished items may not be sold for profit, except for charity purposes. Please acknowledge the author. Thank you.


Oct 12, 2012

New Adventure

It probably took me few years of going back and forth in my mind. But finally, I made that leap of faith and jumped.
I have opened my Etsy store

Stana's Critters etc.

It's a work in progress. I am not sure what will happen next, but it sure will benefit everyone.
I will design more knitted patterns, the toys will hopefully find new home and I hope to have happy customers. In the process I might make some money to buy more yarn, which I would use to make more toys for the charity purposes.
Thank you for visiting.

Oct 9, 2012

How to create soft and cuddly monster


Few weeks ago, my child draw a picture. It was a very specific drawing, with many details. Then I was asked to knit this monster. As always I couldn't say no. We picked the color and yarn.
I took my knitting needles and began to experiment.

 I always wonder if I can capture the vision of the artist. If I can translate the two dimensional drawing into the three dimensional knitted toy. I must have done a good job, since I have received several hugs and kisses in exchange for a new toy to play with.

We named him (or her?) Loopy.

In a sense this is what design is about. Translate an idea or a vision into an actual product.

Now, I have some more drawings. And of course  more monsters to knit.

Thank you for visiting.


Oct 6, 2012

Knitting Pattern for Jiggle


Jiggle
by Stana D.S.

Finished Toy size: approximately 8” (20cm) tall

Yarn: You will need less than a ball of yarn in sport to medium worsted weight. Also you will need small amount of red yarn for mouth and black embroidery yarn for embroidering the eyes.

Recommended Needles size: Double pointed needles US #3/3.25mm (set of 5)

Notions:
Yarn needle, crochet hook, scissors, stitch marker, polyester fiberfill (1 small bag), stitch holders,two safety eyes,small piece of red felt for heart.

Abbreviations: KFB = Knit in front and back of the same st, this creates 2sts from 1st.
SSK= slip st, slip st and knit the 2sts together, this decrease 2sts to 1st.
Gauge: will vary with the yarn used.

INSTRUCTIONS:
Body:
With the main color yarn and one double pointed needles cast on 15sts.
Row 1: Knit 15, then turn the work upside down, with second and third needle pick up and knit 15sts along the cast on edge. Place a stitch marker on the first st., and continue working in the round. (30sts total)
Row 2: *KFB, Knit 13, KFB; repeat from * around (34sts total)
Row 3: *KFB, Knit 15, KFB; repeat from * around (38sts total)
Row 4: *KFB, Knit 17, KFB; repeat from * around (42sts total)
Row 5: *KFB, Knit 19, KFB; repeat from * around (46sts total)
Row 6: *KFB, Knit 21, KFB; repeat from * around (50sts total)
Row 7: Purl around (50sts total)
Row 8 - 56: Knit around 49 rows (50sts total). Stuff the body with fiberfill. At this point transfer the last 9sts in the row onto a stitch holder.
Row 57: Knit first 9sts, and transfer them onto the stitch holder. Knit and cast off the next 7sts from the front and 7sts from the back of your work, using the method of 3 needles bind off. Divide the remaining 18sts onto 3 or 4 needle and continue in the round with these 18sts.
Row 58 - 67: Knit around 10 rows (18sts total). Insert the safety eye at this point if using them.
Row 68: SSK all around (9sts total)
Row 69: Knit around (9sts total). Finish stuffing the top of Jiggle's head. Cut the yarn, leaving long enough tail and thread the end on a yarn needle. Pull the end through the remaining stitches on needles, gather up and close the hole, stitch to secure.
Transfer the 18sts from the stitch holders onto DPN and reattach the yarn, leaving long enough tail. Repeat the Rows 58 -  69 for the second top part of Jiggle's body.  With the long tail from the reattached yarn sew up and secure the openings on the top of Jiggle's body.

Lips: With two double pointed needles, cast on 4sts in red yarn.
Row 1: Knit 4, then turn the work upside down, with second needle pick up and knit 4 sts along the cast on edge.
Row 2: Knit around, 4 sts per needle, (8sts total)
Row 3: *KFB, knit 2, KFB, repeat from * around, (12sts total)
Row 4: Knit and cast off from both double pointed needles at the same time. Cut the yarn, leaving long enough tail, and thread the end on a yarn needle. Sew the lips on the face of Jiggle using the picture as a guide.  

Finishing: If not using the safety eyes, embroider the eyes, using the picture as a guide. Also you can cut out the heart shape from the red felt and sew it onto the Jiggle's chest.

Copyright: This pattern was design and written by Stana D. S. The pattern is for personal use only. The finished items may not be sold for profit, except for charity purposes. Please acknowledge the author.
Thank you.